Email: lee@congmaps.org

CongMaps Instruction Manual

Note: You must first have you account setup by CongMaps administrators before you can follow these instructions. 
CongMaps uses the Google Maps API to generate real time maps.

To access the CongMaps web app go to https://[your congregation name].congmaps.org The first time you try to access the app you will be prompted to enter a password. Once entered you will not be asked again for a year.

To manage your maps go to https://[your congregation name].congmaps.org/manage/ enter the password when prompted.
Adding maps to the app is a 3 step process.

1. Add the map number, name and map centre point in https://[your congregation name].congmaps.org/manage/ (Select “Maps” on the main menu). This will automatically add the map to the main menu of the map app.

2. Add the map outline, block outlines and block labels

3. Add the DNC’s

Settings

The first thing you need to do is set your Congregation name and the default centre latitude and longitude of your congregations territory. 

Go to go to https://[your congregation name].congmaps.org/manage/ and then go to menu -> Settings

Enter your congregation name and then drag the pin to roughly the centre of your congregation’s territory.

The latitude and longitude will automatically change as you move the pin. Scroll down and set the default zoom level these can be changed at any time.
Here you can also set the following: 

Map border colour, block border colour, block fill colour. You can use 17 standard colours which are: aqua, black, blue, fuchsia, gray, green, lime, maroon, navy, olive, orange, purple, red, silver, teal, white, and yellow. OR you can use any hex colour value.

Block fill opacity.

Default map zoom level.

Google Maps API key.

Step 1 – Adding A Map

To add a map go to Menu->Maps and click the “Add Map” button.

Map Number: Enter an integer, I haven’t included any validation yet so just make sure only numbers are entered.

Map Name: Enter a Map Name, this makes it easy for the brothers to identify where the map is. Different congregations use this field differently some may put the main street name on the map, we usually put the estate name i.e. Highland Reserve.

Map Parent: Select the ‘Map Parent’ if applicable. This will make this map a sub menu to the one you select here and is used if you want to group maps by areas or estates (See Map Grouping).

Json File Name: Enter the Json File Name, these are text files that you will be creating later. Each map will contain from 1-3 files. 1 that will draw the red map boundary outline, one that will draw the individual blocks and one that will label the blocks with a number. The only one that is required is the map outline. I suggest working out a naming convention and then sticking to it. i.e “map-1” no extension to the file name is required. When it comes to creating the three files they would be named as follows:

Map outline: map-1.json

Block outlines: map-1-blocks.json

Block labels: map-1-labels.json

These files will be added later in step two.

Map Latitude & Map Longitude: The Map Latitude & Longitude will default to that set in the settings previously. Drag the marker to the centre point of the map, select the zoom level and as soon as you let go of the pin, they will be automatically updated.

Map Zoom Level: This is how far the map zooms in when you first navigate to it from the main menu. The default is 14, a lower number zooms out and a higher number zooms in.

Display DNC’s: Checking this checkbox will display the DNC’s on the map. Why would you ever want to display a map without the DNC’s I hear you ask? Well in our congregation we have maps grouped into areas (See Map Grouping) and if you click on the top level menu item of the area, a map displays of all the individual maps contained in that area and since you won’t actually be using this map display as it’s for display only you can switch the display of DNC’s off.

Click save & the map will now appear in the list of maps added.

Map Grouping

In an effort to restrict the vertical scrolling of maps in the menu for those who have a lot of maps, we have incorporated a method where you can group maps together into areas and have the individual maps displayed as sub menus. This is something that is entirely optional and is not necessary for the maps to function correctly.

The process of creating map grouping can be divided into two steps: 

1.  Create the parent map group (top level menu item) and 

2.  Create the child maps (sub menu items)
STEP 1 PARENT MAP GROUP

As an example lets say we have an estate that has 4 maps contained within it and the name of the estate is Happyville. The maps are maps numbers 5,6,7 & 8.

Firstly you would create a map and have the following settings. For “Map Number” you would enter “4”. For “Map Name” you would enter ” – 8 Happyville”. The rest you would do as normal accept for de selecting the “Display DNC’s” checkbox. In the map app the map number and map name fields are concatenated so this would appear as “4 – 8 Happyville”

STEP 2 CHILD MAPS

To continue with the above example you would now create 4 maps as per normal but with one exception, you would select the parent map created in step one as the “Map Parent”.

Creating the json Text Files

After you have added your maps you can move on to the next step that of creating the map outlines, blocks and block label json text files. This procedure will require you to create a text file using a code editor (don’t use Word or any other word processor). My recommendation is use Visual Studio Code as you text editor, it is a free application and you can download it here

When these are completed you will need to upload them to the webserver using an ftp (File Transfer Protocol) program. I recommend using FileZilla client as again it is a free program, you can find instructions on how to install and configure it here. Both of these programs have both Windows and Mac versions available.
Visual Studio Code

Creating The Map Border File

This is done by using an online tool called the CongMaps GeoJSON Editor go there by clicking here.

You will see that this website is divided into two panes, the one on the right has a google map where you can move and zoom in as you would any google map. The left pane is where the code is added as you draw on the map on the right. To draw your map boundary, make sure you have the “Draw a line” button selected (second button from the right) and then continue single click on the map until you have created a closed shape.
Editor Toolbar
As soon as you close the polygon shape you will see code appear in the left hand pane. You can adjust the points by selecting the hand button (Stop drawing) clicking and holding a point and dragging it to the new position.

Once you have completed the shape. Click on the “Select All” button at the top of the left hand pane to select all of the code that is created, then press Cntr+C to copy the code to the clipboard or Cmd+C on a mac. Then open Adobe Brackets and create a new file by clicking on File -> New, past the code into this file by clicking Cntr+V or Cmd+V on a mac.
Simple GeoJson Editor
Next save the file somewhere where you can get to it like your desktop and name it what ever you used for the “Json File Name” in step one of “Adding a Map” but this time you need to add the file extension json. i.e map-1.json

Drag and drop this file into the right hand pane of FileZilla to upload it to the server.

To test it go to http://[your congregation name].congmaps.org and when you click on map 1 if you have done it correctly it should now show the boundary of your map as well.

Creating The Map Block File

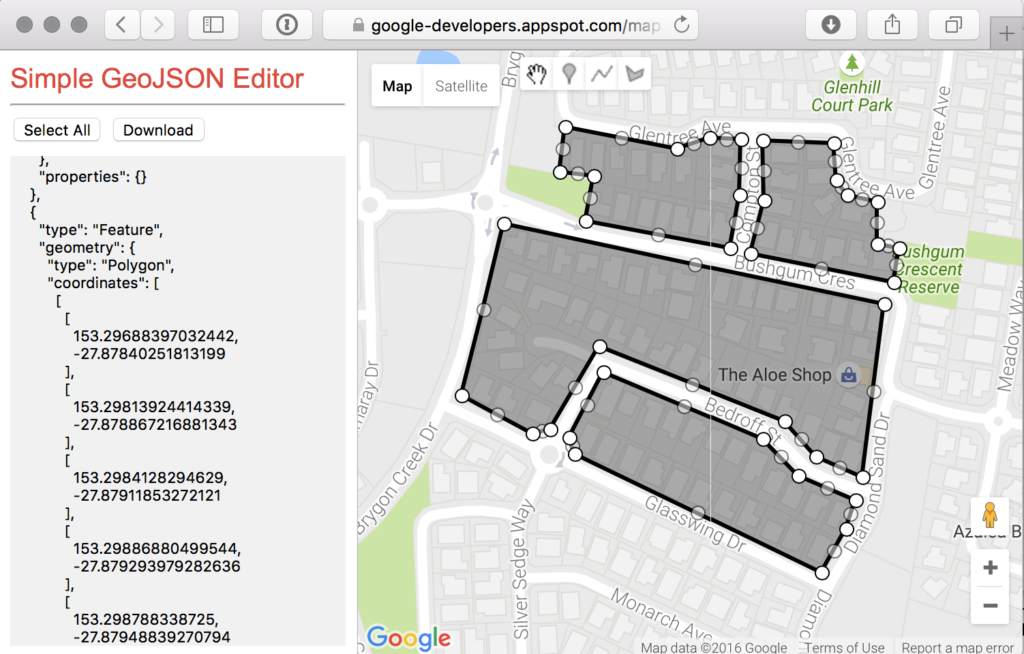
The procedure for adding the map block file is almost identical to that of adding the Map Border File. The only thing that is different is that you should select the polygon button which is the very last button, to draw the shape of the individual blocks. 
Editor Toolbar
After you have the blocks looking like you want them to, as in the map outline procedure, click on the “Select All” button at the top of the left hand pane to select all of the code that is created, then press Cntr+C to copy the code to the clipboard or Cmd+C on a mac. Then open Adobe Brackets and create a new file by clicking on File -> New, past the code into this file by clicking Cntr+V or Cmd+V on a mac.

Next save the file somewhere where you can get to it like your desktop and name it what ever you used for the “Json File Name” in step one of “Adding a Map” but this time you need to add “-blocks” and the file extension “json”. i.e map-1-blocks.json
Map Blocks
Drag and drop this file into the right hand pane of FileZilla to upload it to the server.

To test it go to http://[your congregation name].congmaps.org and when you click on map 1 if you have done it correctly it should now show the boundary of your map and the block outlines as well. Now it’s time for the final part that of adding the block labels to the map.

Creating Block Labels

This is probably the most tricky of the three json files you will need to produce because the format of the json file used by the program is different than that produced by the online GeoJSON Editor. The easiest way is to give you a sample file which contains 3 labels and we will go through the procedure using it. Clicking here will open an example text file with three block labels in it. Select all of the text and create a new json file and name it what ever you used for the “Json File Name” in step one of “Adding a Map” but this time you need to add “-labels” and the file extension “json”. i.e map-1-labels.json.

Now you need to add or delete sections so that you have the correct number of labels in the file. I have highlighted one section of code that will display one label. If you wanted to add another label so that there were four labels in total then you would copy this section of code and paste it after the closing curly brace on line 17. You have to be careful and make sure that you copy the section exactly as shown, that is, include the comma after the curly brace on line 7 but exclude the comma from after the curly brace on line 12.

Next you will need to replace the lon lat pairs with the lat lon pairs you get from the Simple GeoJSON editor. To do this open the editor again and navigate to the map area where you want to add the map labels.

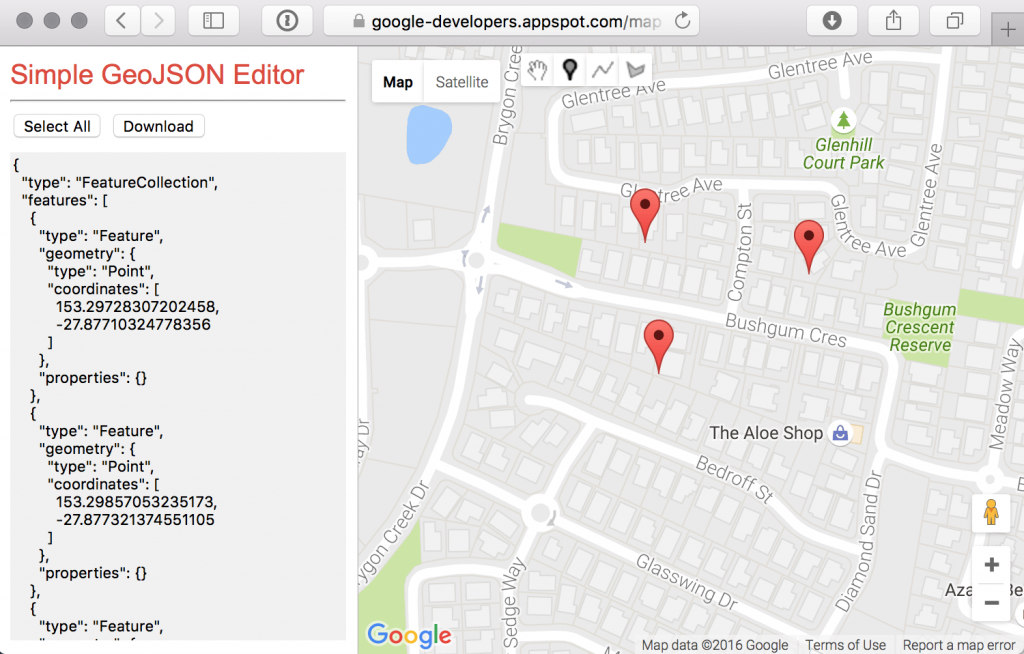
Select the “Add a marker” button and just click once on the map for each label you want to add to the map. You can fine tune their position by click on the “Stop drawing” button (hand icon) and drawing the markers to the new location. Once you have the markers positioned where they should be instead of copying the whole file you will need to copy and paste each individual point coordinate pair into you newly created file and upload it to the server as before.
JSON FileBlock Labels

Direct Links to Maps

It is now possible to link directly to individual maps. This would be useful if you use Deckhand or if you want to just email a publisher the map you are working on. The format of the link would be https://[cong name].congmaps.org/?mapnum=1
© Copyright 2024 CongMaps - Developed by Firth Web Works
Top